Your editor and friends have used the rolls described here for many years in Cornish surf, in Grade III to V white water in the Alps, and at sea. There's nothing zen about them, they work every time, and they're easy to teach.
There are only a few rolling techniques. The name for any particular one depends on your age and nationality. We've used generic names to avoid the debate. We say, call a roll what you like as long as you can do it every time at sea.
Rolling is necessary & easy
If you can't roll you are going to get into trouble, and probably before you expect it. Every kayaker we know can roll every time, except those with old-school folding kayaks and ordinary sit-on-tops.
Rolling is necessary. Without a reliable roll, most places will be off limits to you most of the time. Even familiar waters can become a problem if conditions change unexpectedly, for example because the wind increases while you are out.
Without a reliable roll, you may have a disaster. Not even a professional guide can always carry out a deep-water rescue right away. If you go for an accidental swim in a cave or in the surf zone, or if several people end up in the water at the same time, you may not be rescued until you have drifted into a cliff or you are too cold to climb back into your kayak.
Rolling is easy. Rolling a kayak does not require any unusual strength, or any more co-ordination than it takes to reverse a car into a parking space. Kayak surfers and playboaters roll every time and you can too. If you have a good hip flick, rolling takes very little effort.
There's no need to put off learning to roll until you have mastered every other kayaking technique. In fact it's a lot easier to learn support strokes if you can already roll.
Where & how to learn
If you live in a cool climate, the best place to learn is definitely an indoor swimming pool. However you can learn at the beach, or even at sea.
You could teach yourself from these pages, with an unskilled helper, but the easiest way to learn is with an instructor. With a good instructor, you should be able to learn in two 90-minute sessions. It may take four sessions if you are anxious about having your head underwater.
We find that rolling is easier in a low-volume sea kayak than in any high-volume boat. If a child has difficulty learning to roll it could be because their kayak is too wide. See Child-Size Kayaks. It's probably easier to learn in a 5 metre sea kayak than in a 2.4 metre playboat. During the sweep phase of a roll, a playboat will spin in the horizontal plane when you would rather it stayed still, and if you lean a long way backwards while rolling a short playboat it tries to go vertical.
It is really helpful if the student wears a dive mask to start with. Later on, many people like to wear a nose clip when practicing rolls, but it is nearly as good if you just breathe out steadily through your nose while under water. If your paddle shaft is a plain tube and does not have an oval cross-section where the control hand holds it, it is cheap and easy to add an indexing grip so you always know the angle of your paddle blades, even with your eyes shut.
 Helper in a swimming pool. Clear warm water, waist deep, is ideal. Your helper stands beside you and in the early stages of learning (s)he can help by holding your paddle to keep the blade on the surface. (S)he can also roll you back up if necessary, using the technique described at Swimmer-To-Kayaker Rescue.
A helper need not be a skilled kayaker but will be a lot more use if (s)he knows exactly what you are trying to achieve. (S)he should have a safe and light task, but watch out if the kayaker is muscular and tries to use raw power to make up for lack of technique. Helpers occasionally have to make a vertical leap to avoid having their legs taken off at the knee by a scything paddle blade.
Helper at sea. If you are a confident, sporty person you can learn to roll at sea. You and your helper must both be in kayaks, and it will be easiest if your helper is in something other than a sea kayak.
For the techniques, see Kayaker-To-Kayaker Rescues. Before you go out to roll, have a session in shallow water practicing the bow rescue or paddle rescue, and the side rescue and X-rescue / T-rescue.
When you want to practice your hip flick at sea, use the paddle rescue technique. In other words, get the two kayaks parallel with a gap between them about 60 cm wide. Put your paddle down in front of you so that it bridges the gap between the kayaks. Use the paddle in the same way you would use the rail of a swimming pool.
Practice at sea. Practice in the sea every time you go out. There's no point learning if you can roll only in a swimming pool, wearing a swimming costume and nose clip, after two minutes warning.
If you have difficulty turning your swimming-pool roll into a reliable roll on the sea, try a little gentle surfing on a friendly beach. The fifth time you drag your flooded kayak up the beach, you will have all the motivation you need to stay in your kayak and roll next time.
When you capsize on a wave, you will find that you have to roll with the wave, not against it. Very often, all you have to do is get your paddle into position to roll with the wave, and the wave itself will roll you back upright again. See the comments at Steyr Roll. Occasionally you will find that you need to wait five or ten seconds before you start your roll, to give the wave time to drop you and move on.
If one member of your kayak group is unwilling to practice rolling at sea, it may be because they want to do more practice in a nice warm swimming pool (fair enough!) or that they need to re-think the clothing they wear for kayak trips. If there is no way to overcome their reluctance, they will be a liability on an advanced trip. Any trip may count as "advanced" if the group includes young or inexperienced kayakers. For our definition see Formal Navigation For Advanced Trips.
The basics of rolling
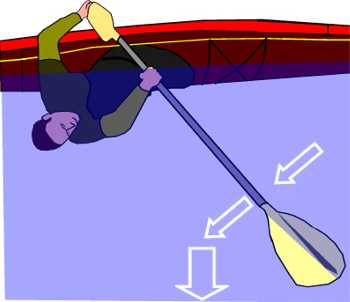
Each of the rolls we teach starts off with one paddle blade sweeping over the surface and then striking vertically downwards. With a bit of practice, you can roll successfully just with the sweep phase, or just with the strike phase which is great for rolling a short playboat.
Only one blade does any work, and we will call that the active blade. Start with it on the surface near one end of the kayak (the START POSITION). Make it skim over the surface, away from the kayak. It acts like a water ski, making your kayak roll onto its side and bringing your body part-way up so that your head is floating just below the surface.
When the active blade is as far out from the side of the kayak as you can reach (the STRIKE POSITION), you make it go down vertically. By resisting your downward strike, the water gives you the support you need to sit upright.
The strike works in the same way as the support strokes we discussed earlier, so timing is important. When you start your strike, obviously your paddle blade starts to sink. When it gets to about 40 cm below the surface it no longer gives much support. The blade takes less than a second to sink to that point, so you have to make full use of the little time you have. The way to do this is with a hip flick.
Long lever roll (Pawlata)
Some call it a technique for beginners, but the Pawlata roll is not just easy to learn. It's also powerful, reliable and very easy to develop into the short lever roll which is most often used in the real world.
Instructions for a long lever roll:
NOTE: The instructions and graphics relate to a feathered paddle with right-hand control and 90 degree offset. This makes for clearer graphics. It's not a recommendation that you buy a paddle with 90 degrees of feather.
60 degrees or 45 degrees are more popular. Click here for a discussion about paddle feather. If your paddle is different, you may need to hold it differently while rolling. The key is to have the correct angle on your active blade. See step 10.
1. Get into your kayak, fit your spraydeck, put on a dive mask and spend 5 minutes practicing your hip flick, either with a helper holding a paddle at water level or in a swimming pool which has a horizontal rail at water level. Practice, practice, practice, on both sides.
2. Have a 5 minute break. If your boat has any water in it, empty it out.
3. Sit in your kayak on the water, spraydeck on, no paddle, helper standing on your right. Capsize, bang three times on the bottom and have your helper bring you back up again with a Swimmer-To-Kayaker Rescue.
4. Put on your dive mask, hold your paddle in the basic paddling position.
5. Slide your right hand along the paddle, to the left. Grasp the paddle just beside your left hand.
6. Slide your left hand along the paddle, to the left. Reach out and grasp the furthest corner of the left blade. Yes, the very end of the paddle. This is sometimes called "extended grip".
7. Lean forwards from the waist.
8. Twist your entire upper body to the left until the paddle is parallel to the side of the kayak.
9. Both arms should be almost straight at the elbow. Both hands should be in the water. The active blade of your paddle must be on the surface, touching the side of your kayak.
10. Look at your active blade. It must be at the correct angle, so that during your roll it will skim over the surface like a water ski. As you look at it now, the edge of the blade which is furthest away from the kayak must be much lower than the edge which is touching the kayak. Twist your wrists until the active blade is at the correct angle. Further than that! During the roll, you will lose a lot of the twist which you put on at this stage, so start with your active blade at 45 degrees to the surface of the water. If your right wrist is not uncomfortable, probably you have not twisted it far enough.
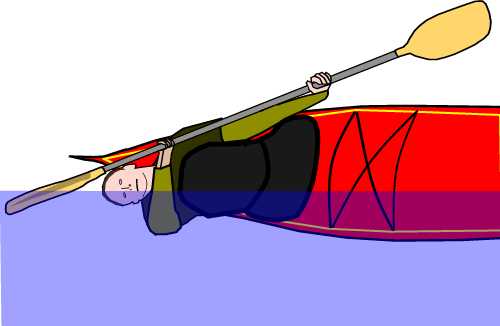
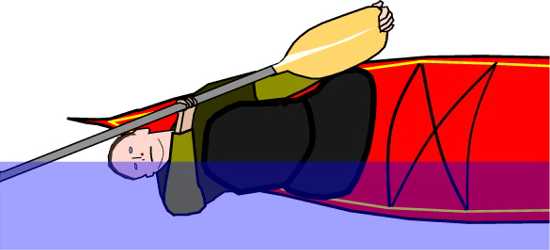
11. Look at the other blade, the one you are holding with your left hand. When your kayak is upside down, this blade must be right up in the air where your helper can see it. In fact, when you are upside down your entire paddle should be up in the air with only the active blade resting on the surface. (You can get into that position without capsizing, but only if your helper holds your kayak. Ask your helper to step forward and hold your kayak firmly with both arms so that you cannot capsize.) Now lean your head and body to the left as far as you can. Further than that! You need to bend your body towards the side on which you are holding your paddle, until your left ribs collide with your left hip and your forehead is nearly touching the surface. Both your hands are now underwater. Your left hand is deep under water. But keep your left elbow very slightly bent. This is your START POSITION.
12. Let's roll. Ask your helper to walk round the kayak until (s)he is standing on your left side.
13. Capsize in the START POSITION. Make sure that you maintain the START POSITION as you go over. When you are underwater, relax a little. Spend five seconds checking that you really are still in the START POSITION. Is your body still bent towards the paddle? Is your active blade on the surface next to the front of your kayak, with the correct blade angle? Is your other blade up in the air?
14. Now that you're upside down with the water supporting you, you can bend your body much further to your left wihtout (much...) discomfort. Do this, so that your head is floating just under the surface. Re-check that your paddle is still in the correct position, with the active blade resting on the surface and the other blade up in the air above the kayak.
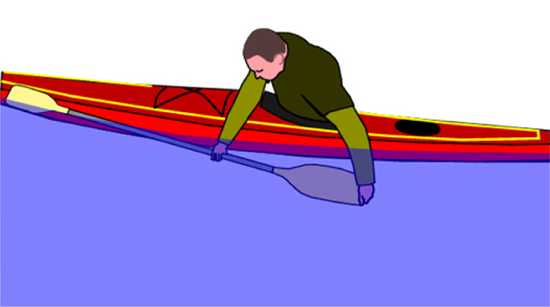
15. You're ready to roll. Push with your right arm so that your active blade sweeps over the surface to your left, away from your kayak. If the blade is at the correct angle it will resist sinking. To help it stay on the surface you will have to twist your body as far as you can to the left. These two things will lift your upper body, so that it starts to emerge above the surface and your kayak starts to roll onto its side. While all this is going on, your other blade is still up in the air. As your right arm moves away from the kayak, your left arm slides over the hull. Your left forearm will be in contact with the kayak's hull:
16. Continue until the paddle is at right-angles to the kayak and the active blade is far away from the kayak. This is your STRIKE POSITION.
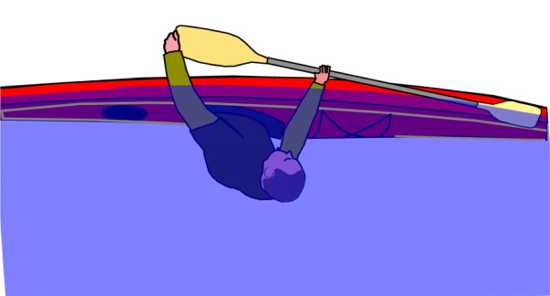
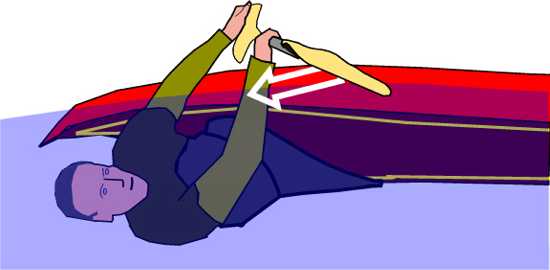
17. Now you are ready to strike. Pull with your right arm so that your active blade goes vertically downwards in the water, and at the same time lean backwards and do your hip flick. The paddle movement has been compared to using a pitchfork to fling a pile of hay up into the air. Always remember, the last thing that comes out of the water is the top of your head.
For a photo sequence of this procedure, see Short Lever Rolls.
Common mistakes
Not many people get it right first time. It is easy to get disorientated underwater and do something completely wrong. For example, from the START POSITION you must sweep your active blade away from the kayak, towards the STRIKE POSITION, but quite often a learner will sweep it the other way, under the kayak. Take your time, think about it, get used to the feeling.
a) Before you capsized, did you put your paddle correctly in the START POSITION? Check whether your hands are the right distance apart as in 5 and 6 above. If they are too close together you won't have enough power, and if they are too far apart, you won't have enough flexibility. The distance between your hands should be about the same as it is when you hold your paddle in the normal paddling position.
b) After you capsized and waited a few seconds, was your paddle still in the correct START POSITION? The shock of hitting the water often moves it to the wrong position. A beginner's active blade often ends up on the wrong side of the kayak, causing total confusion when you start your roll.
c) While you were sweeping the active blade out to the STRIKE POSITION, did it stay on the surface the whole time? If you put the correct angle on the active blade, it should stay near the surface until it reaches the STRIKE POSITION. If you start with too little angle on your active blade, it will instantly slice downwards, going deep underwater where it is no use to you and may hit your helper's ankles. Occasionally a learner goes to the other extreme and puts too much angle on the active blade, so that instead of skimming over the surface it stalls and sinks.
d) When you swept the active blade out to the STRIKE POSITION, did the other blade stay up in the air where your helper could see it? If not - if the other blade was under water when you started your roll - it probably got jammed under the rear deck of the kayak when you tried to strike.
d). When you reached the STRIKE POSITION, did your paddle then go down vertically in the water? It must not slice backwards or forwards. It must just go straight down.
e) Was your timing right? If you have already learnt sculling for support and the high recovery support stroke, you should have a good idea of timing. If you strike too slowly, your active blade will sink deep under water before you finish your roll. Occasionally a very strong person will strike too fast, which is not helpful either. Try some variations on your timing.
 |
f) Did you do a proper hip flick? If you do a good hip flick, it doesn't matter if you didn't get the paddle stroke quite right. The opposite of a good hip flick is bringing your head up first, trying to get some air. It is ALMOST IMPOSSIBLE to roll a kayak if your head comes up first. Your kayak must roll up first, then your body. The last thing to leave the water should be the top of your head. |
Try these solutions
Ask your helper to check that your paddle is in the correct START POSITION after you capsize. Your helper should see your entire paddle up in the air, with the active blade resting on the surface near the front of the kayak. If this is not happening, your helper could hold you as in 11 above and lower you gently into the water while you concentrate on maintaining the START POSITION.
If your active blade starts off on the surface but always sinks before it reaches the STRIKE POSITION, ask your helper to move round so that before you capsize he is standing on your right side about 1.5 metres away from you. He puts his hands together in front of him, just under the surface of the water, as if he was holding a bowl. When you capsize, look for his hands, and when you sweep out to the STRIKE POSITION, try to put your active blade in his hands. It should be resting on his hands, flat and as close as possible to the surface of the water, before you strike.
Note 1 - Be gentle as you sweep your paddle towards your helper - you don't want to cut him off at the knees.
Note 2 - If you look at a kayak from overhead, during a roll you will see it spin a little, like a compass needle. A short kayak will rotate a lot. So, by the time your active blade reaches the STRIKE POSITION your helper may find that he is standing in the wrong place. He must be ready to dance sideways a little until he is in the right place. The correct STRIKE POSITION is at right-angles to the middle of the kayak.
Note 3 - If you feel that you can't get your active blade into your helper's hands, get as close as you can and stop for a couple of seconds so that your helper realises you have a problem. He than grabs your active blade and pulls it up until it is on the surface in a good STRIKE POSITION. He holds it there while you strike.
When you can roll on one side, try it on the other. The technique is just a mirror of the instructions above, except for the amount you twist your wrist in 10 above.
Improvements
Less muscle, more technique
Do as much as you can with your hip flick, so that what you do with your paddle becomes less important. One good way to refine your hip flick is to practice it with a float rather than the swimming pool rail. For example a polystyrene swimming pool float or a paddle float. You should be able to get upright without pressing the float more than 30 cm below the surface. Then try it with a smaller float.
Emphasize the sweep phase?
With a bit of practice, and by carrying out your hip flick while your paddle blade is still sweeping over the surface, you should find that by step 16 the sweep over the surface has brought you upright so there's no need for any vertical downwards strike. Many feel that makes for a better roll.
Emphasize the strike phase?
A sea kayak is long enough to stay put during the sweep phase. A very short playboat may rotate so much that the paddle blade stays almost stationary and the "sweep" contributes nothing to the roll, except to get the paddle in the right place for a downward strike.
There's another factor in favour of having at least some downward strike in your roll. In very rough water, there may be no recognizable surface for the paddle to sweep over.
| Go to next page for: • Short lever rolls • Layback rolls • Steyr roll • Short lever layback rolls • Some other rolls |