On the previous page we looked at:
• Where & how to learn
• The basics of rolling
• Long lever roll
Short lever rolls
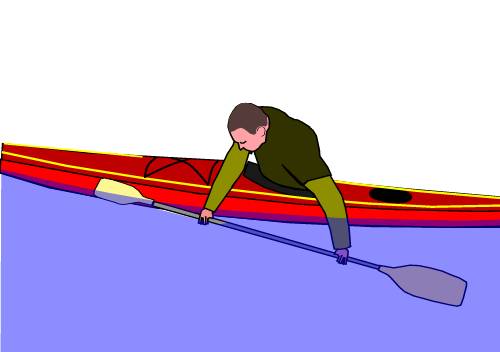
These are the rolls most often used by river, surf and sea kayakers. They're just the same as the long lever roll we looked at on the previous page, except that you hold your paddle in the same places as if you were paddling forwards or doing any other stroke. Obviously you can roll faster if you don't have to change your paddle grip first. Also, you can get right back to paddling as soon as you're upright. However you have a little less paddle leverage so your timing has to be a little more accurate.
We like to roll with a horizontal sweep across the surface followed by a vertical downward strike. Some call it the screw roll (although others would say the screw roll has no vertical component) and it's more or less what Paul Dutky calls the advanced brace roll. Just follow the instructions for the long lever roll but miss out stages 5 and 6. Click here for a sequence of 18 photos.

The better your hip flick, the less you need to rely on your paddle. You can do a short-lever roll with just the horizontal sweep and call it a sweep roll.
Or you can do it with just the vertical downward strike and call it a brace roll or C-to-C roll, which is a very useful technique if you paddle a short playboat on white water.
One way to get a better feel for the way a paddle blade will support you is to sit upright in your kayak and do a "high recovery" support stroke. Then another one, and another, each time going deeper and deeper until you are bringing yourself back upright from a full capsize. As with any high recovery support stroke, never entirely straighten the elbow of the arm that's doing the work. Keep within the safety box by not reaching out too far, and not letting your hand go beyond your head.
Layback rolls
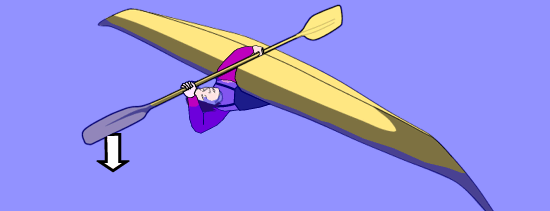
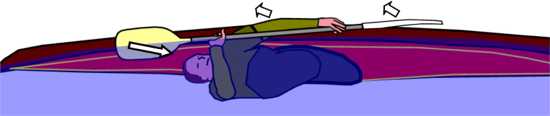
Layback rolls are so called because you start off with your body lying as far backwards as you can go, ideally with your head touching the rear deck of your kayak. They are popular with kayak surfers who often capsize while moving forwards at high speed. The force of the water grabs their body and paddle and makes them lean backwards so that their heads are almost touching the rear deck. No problem.
Steyr roll
As with the forward-leaning rolls, there is a long lever layback roll called the Steyr and various short lever versions.
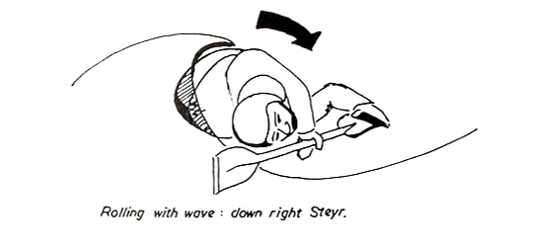
Here's an illustration of a Steyr roll from Alan Byde's 1969 book Living Canoeing. It illustrates the point that when you roll in surf, it's very easy to roll with the wave. He said "roll over the paddle, down shore-side, up sea-side. It will be found that this is very easy requiring the minimum of power. Rolling the wrong way is not possible".
Below we give instructions for the short lever version. If you want to start with the long lever version, the Steyr roll, just add the following at step 2: For a roll on the left, your right hand grips the shaft of the paddle in the place normally occupied by the left hand, and your left hand holds the extreme end of the paddle.
Short lever layback rolls
Again, the technical name depends on your age, nationality and whether the paddle just sweeps over the surface or also strikes down at any point. Names include the reverse screw roll, the reverse sweep roll, the back deck roll and the rodeo roll.
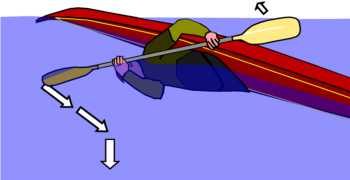
1. We suggest that you first learn to do an ordinary short lever roll, because the STRIKE POSITION and the strike are exactly the same. In short-lever rolls, your hands always hold the paddle in the same grip.
2. Again, we will assume you have a right-hand control paddle and we will start with a roll on the left. Lean backwards as far as you can. Hold your paddle in the basic paddling position. Now put it into the START POSITION by bringing your right hand up to the point of your left shoulder. Your left hand stays where it is. The blade by your head is the active blade.

3. We want your active blade at an angle which will make it skim over the surface like a water ski when you capsize and push it away from you. Twist your right wrist until your active blade is at a 45 degree angle to the surface of the water.
4. Capsize. Lean your body as far as you can to the left so that your head and left shoulder are just under the surface, your active blade is just above the surface, or as close to the surface as you can get it, and the other blade is up in the air. Your helper should see your whole left arm out of the water even before you start to sweep the active blade out to the STRIKE POSITION.
5. Check that the active blade is at a good angle. Now push it away from you. As you do so, keep your left arm up and pull it backwards. Make your active blade sweep over the surface towards the STRIKE POSITION.
If your active blade is at the correct angle it will resist sinking. To help it stay on the surface you will have to twist your body as far as you can to the left. These two things will lift your upper body, so that it starts to emerge above the surface and your kayak starts to roll onto its side.
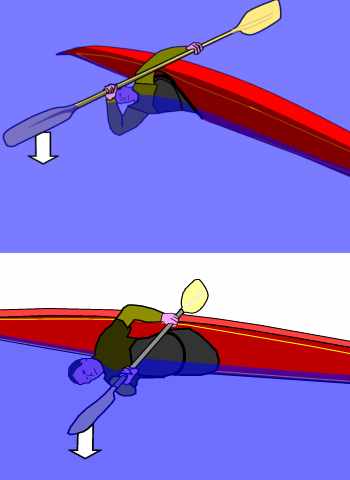 7. When you reach the STRIKE POSITION, pull with your right arm so that your active blade goes vertically downwards in the water, and at the same time do your hip flick.
Always remember, the last thing that comes out of the water is the top of your head.
When you can do this roll on the left, practice on the right. And practice regularly in the sea, preferably after real capsizes in surf.
Keep practicing. With a good hip flick and good timing, you will find that steps 1-6 are enough to get you upright.with the sweep over the surface and no vertical downwards strike. Some feel that makes for a better roll.
However in very rough water there may be no recognisable surface. Also, the sweep phase isn't very effective if you're in a very short playboat. That makes a vertical downwards strike very useful.
Other rolls
There are many other rolls. Some say thirty-five but it's like the Kama Sutra, it depends how you count.
For more information about all levels of rolling, we recommend two books:
• Eskimo Rolling For Survival (Derek Hutchinson, A&C Black, 1988). It's out of print, but usually available secondhand on the internet.
• The Bombproof Roll & Beyond (Paul Dutky, Menasha Ridge Press 1993, or revised 2nd edition 2005)
Hand Roll
No paddle needed. For some kayakers the hand roll is a myth, for others it is something any teenager in their kayak club can do in the swimming pool. We don't know many people who can do a hand roll wearing an anorak, buoyancy aid and helmet.
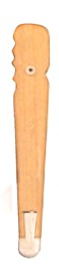 An Inuit hunter who has capsized and can't reach his paddle might use some other equipment to give him the lift he needs to roll. It must either be buoyant or shaped something like a paddle blade. For example the norsaq illustrated at left and here. This is a stick about 43 cm long and with a flattened cross-section. Its real purpose is to be held in one hand and used to give extra speed and power when throwing a harpoon.
Even a knife is better than nothing but it is possible with practice to roll using just your hands, or just one hand.
Although seldom any use in the real world, the hand roll is a great way to find out whether you are doing a truly effective hip flick. Your timing has to be precise. It is quite easy to do in a swimming pool if you cheat a little by capsizing and going straight into the roll as your body pendulums up the other side.
Let's go through the technique for a hand roll on the left. When you first start to learn it you may want to hold something buoyant in your right hand. You could use a polystyrene swimming pool float or a paddle float.
a)
Start by sitting upright. Bring your right arm up until your right elbow is in front of your eyes. As you bring your right arm up, flex your right elbow to about 90 degrees so that your right hand ends up out to your left side, just above and beyond your left shoulder. Press the back of your left hand against your right shoulder; this helps you keep everything lined up as you hit the water. Now bring your left hand up, palm facing forward. Put your left hand below your right hand, so that both hands are open, side by side, palms facing forwards and upwards.
b)
Rotate your face and shoulders to the left. Lean as far as you can to the left and backwards, as if you were trying to get your left shoulder down onto the surface of the water. (You can get into that position without capsizing, but only if your helper holds your kayak. Ask your helper to step forward and hold your kayak firmly with both arms so that you cannot capsize.)
c)
Capsize to the left. Underwater your body, like a pendulum, goes vertical and a little beyond.
d)
Before the pendulum starts swinging back to vertical, lean even further to the left and straighten your left arm. The idea is to get the back of your head practically touching the rear deck, both hands as near the surface as possible, and both palms facing the bottom of the swimming pool. Strike straight downwards with both hands together, and as you do so, lean smoothly backwards and carry out a hip flick.
e) Your hands go over the top of your head and down on the other side. When your left arm starts to descend past your right shoulder it no longer exerts any useful pressure on the water but many people find it can still give crucial assistance if, in the final moments of the roll, they fling it across the kayak to the left.
Wow, you did it!